Saturday, December 27, 2008

A hand at printmaking

Where mature inks dance under rollers, where every scratch twirls in colors and blends into imaginations to spin webs of stories flowing from the mesh of hues.

I talk of printmaking. Printing is defined as the transferring of ink from one prepared printing surface to a piece of paper or any material. Then printmaking is basically the techniques of making prints. There are mainly three divisions to printmaking: relief, intaglio and surface. By relief, as the name suggests, I mean the raised portions on a printing plate which can either be achieved by carving out all the negative area that the artist does not want to print or raising the surface that the artist wants to print as in the case of adding textures on to a plate which would put them on a slightly higher level than the rest of the plate. There are different types of relief techniques a few being linocut, woodcut, metal cut.

Intaglio refers to grooves lower than the level of the printing plate. This means that after inking and wiping the plate off, of, excess ink, only the ink that rests in the grooves would be printed. Some techniques of intaglio are etching, engraving, mezzotint, aquatint, chine-colle and dry point.

Surface or planographic would be the usage of the entire printing surface and some parts are treated to make the image. Planographic techniques include: lithography, monotyping and digital techniques.

Another kind of printing is the collograph print. Collography is a technique used in printmaking where any textured found material is adhered to the printing plate. This texture is captured on the paper after the print is created. Through this technique one can experience the feel of a multitude of textures in one go. This roughly falls in the relief category however we do not create the texture on the plate in this case, we only choose them.

In the last two weeks of my semester I was offered the choice of electives. I could choose one discipline to work in for two weeks. My choices being oil painting, printmaking, drawing, calligraphy, off-loom weaving, screen printing, interior design and wood sculpture; I chose printmaking.

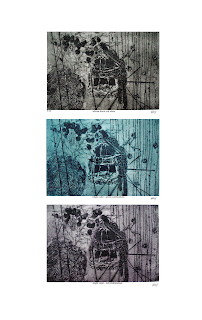
In our two week elective we learnt the collograph and some experimental techniques. My work had characteristics of all kinds of printing; the relief as in the collographs (textures), grooves and scraping as in the intaglio technique and I also used the surface by applying photocopy paper to give a hue in the picture. I first experimented with a lot of textures in my first plate and in my second printing plate I used those textures to form a composition in which I used my textures and I also craved into my printing plate. Then I produced two editions (two identical prints), one final sheet of single color (instead of black) and then I did a top roll and an experimental, for each.

After the printing plates are ready and dried you shilak them two to three times to make sure that the textures are further reinforced. Once it dries up, it is ready to be printed. I used a thick spotting brush and brushed in the ink making sure that all the grooves were covered. Once that is done I wiped the excess to the extent that the wiping paper was hardly getting stained. Then damp paper was placed on it and the press was rolled over it in a smooth motion.


Black and white editions and single color (test and final plate):


For the top roll I first prepared my plate the way I just described, then I took a roller, spread some ink (of a different color) on a clean surface and rolled the roller over it, rotating it every time until there was an even distribution of the ink on the roller. Once this is achieved, I rolled the roller over my plate smoothly in one go and then I printed it.


These were my testing prints for the top roll, before I printed the final top rolls, I experimented with the color combinations. First applying half a top roll of white and half of yellow over a base plate of maroon, then I applied half a top roll of orange and half of brown over a base plate of dark green to turquoise.


These were the final top roll results, where I did a bronze red top roll over a grey-blue base plate on my final plate and a yellow top roll on a maroon base plate for my test plate


These were the final results of the experimental prints of my test and final plates.

The experimental sheet was very interesting. After preparing the sheet for printing I made an inverted collage over my printing plate with glue facing upwards so that it would stick to the printing paper. I used foil, golden paper, newspapers and glaze papers for the collage. I also used handmade paper which gave me a very interesting result. In this case the ink did not stay on the handmade paper, but it actually went through it and spread itself behind it according to the veins of the paper. We also had the option of photocopy transfer.
Tuesday, December 2, 2008

naked raku - not quite naked


naked or resist raku:
we applied a separating slip to bisqued ware and then a clear crackle glaze over it. we were supposed to burnish the green wear but we had already bisqued the pots. the separating slip was applied to clean bisqued ware, then we let dry and then over it the clear crackle glaze was applied.

separating slip (used in the picture):

fire clay 50
china clay 20
grog (60 mesh) 20
potash feldspar 10

[tim andrews' recipe]
use only over a surface with terrisigilata slip and burnishing;

china 50/60
quartz50/40

clear transparent crackle glaze (used in the picture):

borax 75
quartz 30
bentonite 5


Monday, December 1, 2008

moulded

i casted two forms for this assignment: the ball bottomed vase and a bottle


self portrait in low relief -raisin casted

plaster mold of relief made in clay:


raisin cast washed and polished:


Discover the new Windows Vista Learn more!

Friday, November 28, 2008

just found my tickets

My second half of my second year has been a compact experience of knowledge, distractions, entertainment and enjoyment. I feel to have achieved a large body of work this semester and much knowledge, more of which was due to experience, trial and error.

I have learnt that no matter what precautions one may take, one must prepare themselves for the worst when they keep their work in the kiln and if it has blasted then no matter what happens to it, the worst hasn't happened. I have, to some extent learned not to love each piece that that I make to an extent where I either cannot critique it or see it crack or break.

I feel that an introduction into high fire and wood fire glazes has opened up to me an entire field that I was very hesitant about. It has made me love wood firing even more and every time I experience results of wood fired pieces I can't help but be amazed. I feel that due to the intensive wood firings that I have gone through, I feel I am capable of handling an entire wood firing however I feel I need to have done more readings.

Apart from all this I feel I am susceptible to distractions. I have realized that for me to work at my optimum I still need to learn to cope up with distractions and maybe try to express them in my work rather than not be able to work at all. I also feel that I could have done a lot better in some assignments and I had found myself wishing to have had more time for some assignments since they were so interesting but I felt I couldn't do them justice.

I had most enjoyed the totem pole assignment. I felt that was my best assignment this term despite the fact that it cracked entirely I also loved half of the naked clay assignment while its other half would be my weakest assignment. The assignment on the moulds was also very interesting but I had no time to think or to enjoy it as was the case with the naked clay project.

So overall, this semester and this year was a lovely year for me. I feel I have learned a lot from both the visiting and the permanent faculty in very contrasting ways and I feel I can approach them with much more ease then I could before. I have learnt to love my studio, the atmosphere, and the people I work with, since the day isn't complete until I do not have a brush of all of them.


Invite your mail contacts to join your friends list with Windows Live Spaces. It's easy! Try it!

Naked clay


After application and firings:


(smoke/saggar firing)


(gas fired)


.


teabowls

bisqued, 900 degrees


gas fired, 1240 degree, oxide application


smoke/saggar firing


wood fired, 1280 degrees
(the semi porcelain has developed a slight blue tinge)


vessels

Bisqued 900 degrees:


Gas fired 1240 degrees, oxide application:


Wood fired vessel and cup:


clay bodies

CLAY BODIES:

White stoneware:


Before firing:

color

grey

shrinkage

none

warp age

hardly

plasticity

Good to work with and good for throwing

After firing:

color

White

Shirinkage

Hardly

Warpage

None

Maturing temperature

1280

porosity

0.5%

comments

Not suitable for wood firing, since it cracks. It is also not a good body for large pieces since they also crack.

Pure porcelain


Before firing:

color

White

shrinkage

None

warp age

hardly

plasticity

Difficult for throwing

After firing:

color

White

Shirinkage

Hardly

Warpage

None

Maturing temperature

higher

porosity

-

comments

Needs to reach 1300 for more for desired result

Semi porcelain


Before firing:

color

grey

shrinkage

None

warp age

hardly

plasticity

Fairly plastic

After firing:

color

White

Shirinkage

Hardly

Warpage

None

Maturing temperature

higher

porosity

-

comments

Needs to reach 1300 for more for desired result and has given a slight blue haze in wood firing


Explore the seven wonders of the world Learn more!

Thursday, November 27, 2008

glaze tests

GLAZES:

some glaze recipies required the use of bone ash which is not availible here so fired and made bone ash myself.

The result of the firing is pure white bones, which i then curshed into a very fine powder in a blender. after adding it to the glaze, i milled the glaze for atleast 3-4hours.

Glaze Recipe

Success

Results / comments

TOMATO RED:

· Sodium feldspar

· Silica

· Whiting

· China clay

· Magnesium carbonate

· Bone ash

· + red iron oxide

yes

Does not achieve a red but it gives a good melt at cone 9 with a green

Glaze recipe

Success

Results / comments

MASHIKO:

· Sodium feldspar

· Silica

· Ball clay

· Wallastonite

· Talc

· Bone ash

· + red iron oxide

· + manganese dioxide

· + tin oxide

yes

Gives a good melt and a good brown where applied thin.

Glaze recipe

success

Results / comments

OILSPOT:

· Sodium feldspar

· Silica

· China clay

· Talc

· + red iron oxide

· +cobalt

yes

Gives a blue where applied thin on higher temperature, however, it also achieves a bottle green under same tests.

Glaze recipe

success

Results / comments

CLEAN CRACKLE:

· Sodium feldspar

· Whiting

· China clay

yes

Good melt and light crackles at 1280

Glaze recipe

success

Results / comments

RAANIA'S GLAZE 9

· Sodium feldspar

· China clay

· Wood ash – washed and sieved

no

Gave uncertain effects in all firings

Glaze recipe

success

Results / comments

CLEAR CRACKLE(308):

· Potassium feldspar

· Whiting

· China

· Flint

no


Glaze recipe

success

Results/comments

COOL CELADON(316):

· Potassium feldspar

· Whiting

· Ball clay

· Flint

· +red iron oxide

No

Higher melting point than cone 9

Glaze recipe

success

Results/comments

DAVID LEACH PORCELAIN GLAZE:

· Potassium feldspar

· China clay

· Flint

· Whiting

no

Did not melt in any glaze testing firings.

Glaze recipe

success

Results/ comments

RAANIA RED:

· Red clay

· Wood ash

no

Did not melt


Connect to the next generation of MSN Messenger Get it now!