Where mature inks dance under rollers, where every scratch twirls in colors and blends into imaginations to spin webs of stories flowing from the mesh of hues.
I talk of printmaking. Printing is defined as the transferring of ink from one prepared printing surface to a piece of paper or any material. Then printmaking is basically the techniques of making prints. There are mainly three divisions to printmaking: relief, intaglio and surface. By relief, as the name suggests, I mean the raised portions on a printing plate which can either be achieved by carving out all the negative area that the artist does not want to print or raising the surface that the artist wants to print as in the case of adding textures on to a plate which would put them on a slightly higher level than the rest of the plate. There are different types of relief techniques a few being linocut, woodcut, metal cut.
Intaglio refers to grooves lower than the level of the printing plate. This means that after inking and wiping the plate off, of, excess ink, only the ink that rests in the grooves would be printed. Some techniques of intaglio are etching, engraving, mezzotint, aquatint, chine-colle and dry point.
Surface or planographic would be the usage of the entire printing surface and some parts are treated to make the image. Planographic techniques include: lithography, monotyping and digital techniques.
Another kind of printing is the collograph print. Collography is a technique used in printmaking where any textured found material is adhered to the printing plate. This texture is captured on the paper after the print is created. Through this technique one can experience the feel of a multitude of textures in one go. This roughly falls in the relief category however we do not create the texture on the plate in this case, we only choose them.
In the last two weeks of my semester I was offered the choice of electives. I could choose one discipline to work in for two weeks. My choices being oil painting, printmaking, drawing, calligraphy, off-loom weaving, screen printing, interior design and wood sculpture; I chose printmaking.
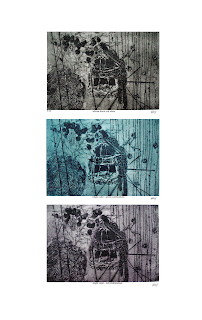
In our two week elective we learnt the collograph and some experimental techniques. My work had characteristics of all kinds of printing; the relief as in the collographs (textures), grooves and scraping as in the intaglio technique and I also used the surface by applying photocopy paper to give a hue in the picture. I first experimented with a lot of textures in my first plate and in my second printing plate I used those textures to form a composition in which I used my textures and I also craved into my printing plate. Then I produced two editions (two identical prints), one final sheet of single color (instead of black) and then I did a top roll and an experimental, for each.
After the printing plates are ready and dried you shilak them two to three times to make sure that the textures are further reinforced. Once it dries up, it is ready to be printed. I used a thick spotting brush and brushed in the ink making sure that all the grooves were covered. Once that is done I wiped the excess to the extent that the wiping paper was hardly getting stained. Then damp paper was placed on it and the press was rolled over it in a smooth motion.
Black and white editions and single color (test and final plate):

For the top roll I first prepared my plate the way I just described, then I took a roller, spread some ink (of a different color) on a clean surface and rolled the roller over it, rotating it every time until there was an even distribution of the ink on the roller. Once this is achieved, I rolled the roller over my plate smoothly in one go and then I printed it.
These were my testing prints for the top roll, before I printed the final top rolls, I experimented with the color combinations. First applying half a top roll of white and half of yellow over a base plate of maroon, then I applied half a top roll of orange and half of brown over a base plate of dark green to turquoise.
These were the final top roll results, where I did a bronze red top roll over a grey-blue base plate on my final plate and a yellow top roll on a maroon base plate for my test plate
These were the final results of the experimental prints of my test and final plates.
The experimental sheet was very interesting. After preparing the sheet for printing I made an inverted collage over my printing plate with glue facing upwards so that it would stick to the printing paper. I used foil, golden paper, newspapers and glaze papers for the collage. I also used handmade paper which gave me a very interesting result. In this case the ink did not stay on the handmade paper, but it actually went through it and spread itself behind it according to the veins of the paper. We also had the option of photocopy transfer.


No comments:
Post a Comment